Sunday, 1 December 2013

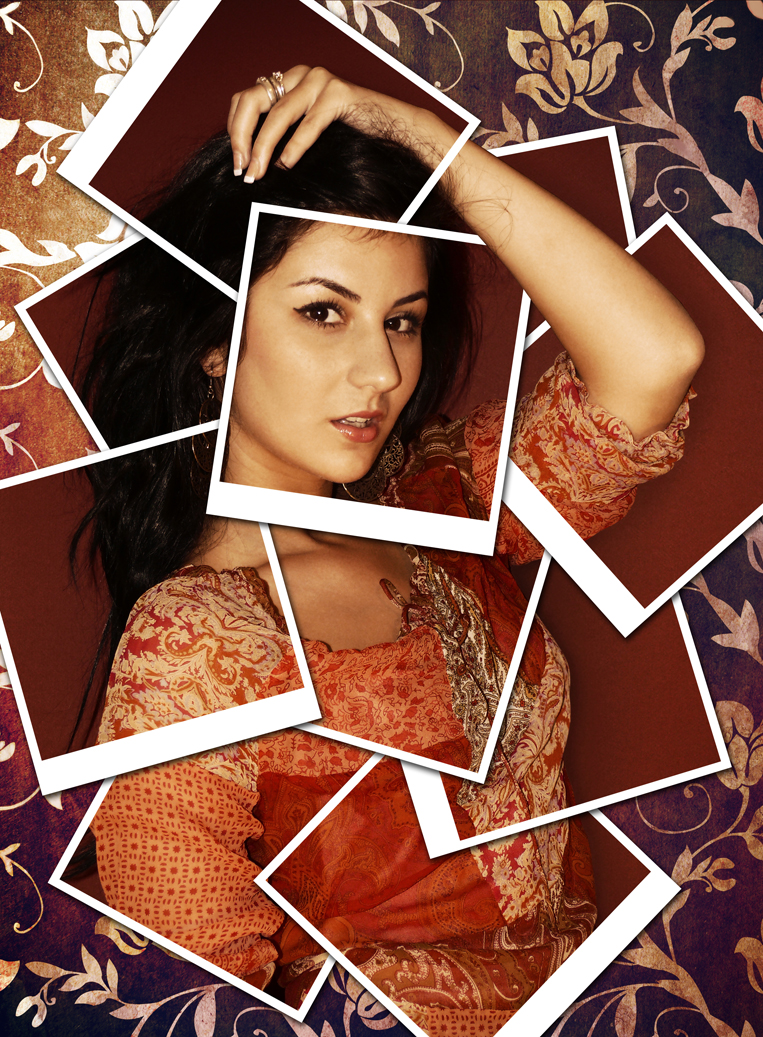
HOW TO SPLIT AN IMAGE INTO POLAROID PHOTOS

HOW TO SPLIT AN IMAGE INTO POLAROID PHOTOS

Final Image
Step
01
cosmin
Member since:
Sep 2010
Open the image you’ve download or your own, it doesn’t matter because this tutorial can be used on what image you want. Double click the background layer to unlock and rename the layer background.
Step
02
cosmin
Member since:
Sep 2010
The easiest way to do the Polaroid images is this (just pay attention). Using the rectangle tool and this color #7e7e7e, draw a square (Hold down SHIFT for a square). Name this layer “square 1”.
Step
03
cosmin
Member since:
Sep 2010
Duplicate the square (press CTRL+J), rename the layer to “Polaroid 1” move it under the “square 1” change the color to white then transform it like me (CTRL+T). To scale this layer (CTRL+T) from center, hold down SHIFT and ALT then drag from a corner. Next, drag from the lower point so this will look like a Polaroid photo.
Step
04
cosmin
Member since:
Sep 2010
Select “Polaroid 1” and “square 1” and rotate them CTRL+T like I did.
Step
05
cosmin
Member since:
Sep 2010
Pay attention to this step, hold down CTRL and click on the square layer where I marked for you (this will do a selection around the square). Now pick the polygonal lasso tool and go to the background layer. Press the right click on the selection you’ve made around the square and go to Layer via Copy (make sure you are on the background layer).
Step
06
cosmin
Member since:
Sep 2010
You see that now you have a new layer under the “Polaroid 1”, rename this new layer to “picture 1” and move it on top of the “square 1” and link it to “Polaroid 1” (select picture 1 and Polaroid 1 then click Link layers).
Step
07
cosmin
Member since:
Sep 2010
Now select “Polaroid 1” and “square 1”, duplicate them (right click> duplicate layers) and rename them to “Polaroid 2” and “square 2” (drag this 2 new layers under the Polaroid 1). You can delete now “square 1”. You will repeat this step for every Polaroid image, and you will rename them consecutive (Polaroid 3, Polaroid 4, etc.)
Step
08
cosmin
Member since:
Sep 2010
Select “Polaroid 2” and “square 2” > CTRL+T > Rotate and move them like I did.
Step
09
cosmin
Member since:
Sep 2010
Repeat step 5 and rename the layer “picture 2” then link it to “Polaroid 2”. “Picture 2” layer needs to be on top of “square 2”.
Step
10
cosmin
Member since:
Sep 2010
Repeat step 7 but with “Polaroid 2”, “square 2” and rename them to “Polaroid 3” “square 3” (delete “square 2”). Move and rotate the new layers like I did (make sure the new layers are under “Polaroid 2”).
Step
11
cosmin
Member since:
Sep 2010
Repeat step 5, rename the new layer “picture 3” and link it to “Polaroid 3”.
Step
12
cosmin
Member since:
Sep 2010
Again duplicate “Polaroid 3”, “square 3” rename it like usual, then delete “square 3”. Move and rotate “Polaroid 4” and “square 4” like I did (make sure this new layers are under “polaroid 3”). Now use step 5 again, rename to “picture 4” and link it to “Polaroid 4”.
Step
13
cosmin
Member since:
Sep 2010
Repeat the steps above for “Polaroid 5”, “square 5” move and rotate them like me then create “picture 5” layer and link it like usual.
Step
14
cosmin
Member since:
Sep 2010
The same steps for “Polaroid 6”, “square 6” then “picture 6” just move and rotate it like I did (the new layers always needs to be on top of the background layer and under the last Polaroid you’ve made).
Step
15
cosmin
Member since:
Sep 2010
You need only 4 more Polaroid images, so repeat the steps above and arrange them like I did.
Step
16
cosmin
Member since:
Sep 2010
Now let’s do a trick with the hand. Using polygonal lasso tool, make a selection like I did (on the background layer) then right click > layer via copy. Rename the new layer to “hand” and move it on top of the layers. The hand looks like it’s out from an image now.
Step
17
cosmin
Member since:
Sep 2010
Now we need some shadows, double click on “Polaroid 1” layer. Go to drop shadow and use my settings (angle 120, distance 10, spread 15, size 25).
Step
18
cosmin
Member since:
Sep 2010
The easiest way to put a shadow on each Polaroid image is this. Right click on “Polaroid 1” layer > copy layer style. Select all the Polaroid layers (“Polaroid 2”, “Polaroid 3”, etc.) > right click > Paste layer style.
Step
19
cosmin
Member since:
Sep 2010
The last step is to put a nice background. So open the pattern texture and paste it into our document. Call the new layer “Pattern background” and move it on top of the background layer. Your result should look like mine.

How to create Pink Lady Photo Manipulation in Photoshop


How to create Pink Lady Photo Manipulation in Photoshop

Today, I’m going to show you how to transform a simple lady photo into a pink lady photo manipulation using Photoshop techniques. In this tutorial, you will learn how to retouch a face and create a pink background from different shapes. Layered PSD file included. Let’s get started!

Final Image Preview

How to create Pink Lady Photo Manipulation in Photoshop CS4
Create a new document (Ctrl+N) in Adobe Photoshop with the size 1920px by 1200px (RGB color mode) at a resolution of 72 pixels/inch. Use the Paint Bucket Tool (G) to fill with #B9ABA0 color the new background layer.
How to create Pink Lady Photo Manipulation in Photoshop CS4
Next we’ll create a new layer and select Soft Round brush from Brush Tool (B)
How to create Pink Lady Photo Manipulation in Photoshop CS4
Use this brush to paint the middle part of the background. The brush’s color is #FFF0EC
How to create Pink Lady Photo Manipulation in Photoshop CS4
Find a stock photo with a model represented on it, I used this photo from deviantart. I would like to thank theauthor of this photo:
How to create Pink Lady Photo Manipulation in Photoshop CS4
Remove the background using your favorite tools like Pen Tool (P)Magic Wand Tool (W)Magnetic Lasso (L) or even a simple Filter>Extract and insert it on a new layer in our main document.
How to create Pink Lady Photo Manipulation in Photoshop CS4
Create a new layer and fill it using the Paint Bucket Tool (G) with #DA2B62 color
How to create Pink Lady Photo Manipulation in Photoshop CS4
Set Fill to 47% for this layer and change Blending mode to Overlay
How to create Pink Lady Photo Manipulation in Photoshop CS4
Hold down Alt (Windows) or Option (Mac OS) and click between the girl’s layer and the layer filled with pink color (on the Layers panel) to create a clipping mask
How to create Pink Lady Photo Manipulation in Photoshop CS4
Now we have the content of the pink layer only visible within the content of the layer containing the girl
How to create Pink Lady Photo Manipulation in Photoshop CS4
Click on the same layer on the bottom part of the layers’ panel on Add layer mask icon and select the Soft Round brush of black color (Opacity 20%)
How to create Pink Lady Photo Manipulation in Photoshop CS4
Paint in the mask to hide the zone of the eyes and the cheeks.
How to create Pink Lady Photo Manipulation in Photoshop CS4
Click Create new fill or adjustment layer from bottom part of the Layers panel and select Photo Filter to change the color balance. In the Adjustments panel, select the Color option, click the color square, and use theColor Picker to specify the pink color for a custom color filter.
How to create Pink Lady Photo Manipulation in Photoshop CS4
To adjust the amount of color applied to the image, use the Density slider or enter a percentage in the Densitybox.
How to create Pink Lady Photo Manipulation in Photoshop CS4
Hold down Alt (Windows) or Option (Mac OS) and click between the girl’s layer and the Photo Filter adjustment layer (on the Layers panel) to create a clipping mask
How to create Pink Lady Photo Manipulation in Photoshop CS4
Now we have the Photo Filter adjustment layer only visible within the content of the layer containing the girl
How to create Pink Lady Photo Manipulation in Photoshop CS4
Click Create new fill or adjustment layer from bottom part of the Layers panel and select Curves to adjust the curve shape as shown to make a little color corrections.
How to create Pink Lady Photo Manipulation in Photoshop CS4
Hold down Alt (Windows) or Option (Mac OS) and click between the girl’s layer and the Curves adjustment layer (on the Layers panel) to create a clipping mask
How to create Pink Lady Photo Manipulation in Photoshop CS4
Now we have the Curves adjustment layer only visible within the content of the layer containing the girl
How to create Pink Lady Photo Manipulation in Photoshop CS4
Create a new layer and choose the Soft Round brush of white color (Opacity 15%)
How to create Pink Lady Photo Manipulation in Photoshop CS4
Use this brush to make lighter the girl’s face.
How to create Pink Lady Photo Manipulation in Photoshop CS4
Set the Blending mode to Lighter Color for this layer
How to create Pink Lady Photo Manipulation in Photoshop CS4
Next we’ll represent one more new layer and apply the Soft Round brush mentioned below and white color (Opacity 20%) to retouch more the girl’s face and her hair.
How to create Pink Lady Photo Manipulation in Photoshop CS4
Click on the same layer on the bottom part of the Layers panel on Add layer mask icon and select the Hard Round brush of black color
How to create Pink Lady Photo Manipulation in Photoshop CS4
Paint in the mask to get color on the girl’s lips..
How to create Pink Lady Photo Manipulation in Photoshop CS4
Set the Blending mode to Luminosity for this layer
How to create Pink Lady Photo Manipulation in Photoshop CS4
Next we’ll represent a small ellipse of the color #FF3030, using the Ellipse Tool (U).
How to create Pink Lady Photo Manipulation in Photoshop CS4
Set Fill to 15% for this layer
How to create Pink Lady Photo Manipulation in Photoshop CS4
Make many copies of the layer containing the small ellipse and apply the Free Transform (Ctrl+T) command to change the copies’ sizes, placing them as it is indicated below.
How to create Pink Lady Photo Manipulation in Photoshop CS4
Combine in a group all the layers composing the ellipses (press CTRL button to select the necessary layers and hold on the left mouse’s button while dragging the selected layers on Create a new group icon from bottom part of the Layers panel). Put the group layers into a single layer. Select the group firstly and then press CTRL+E toMerge Down.
Set Fill to 69% fro this layer and click on Add a layer style icon from bottom part of the Layers panel and select Drop Shadow
How to create Pink Lady Photo Manipulation in Photoshop CS4
Add Inner Shadow
How to create Pink Lady Photo Manipulation in Photoshop CS4
We’ve got the next effect on the ellipses:
How to create Pink Lady Photo Manipulation in Photoshop CS4
Make a copy of the last represented layer and choose Free Transform (Ctrl+T) command to turn over the copy, applying here Filter>Blur>Gaussian blur
How to create Pink Lady Photo Manipulation in Photoshop CS4
Set the Blending mode to Linear Light for this layer
How to create Pink Lady Photo Manipulation in Photoshop CS4